
Hi everyone, today we want to return on the ‘et_epanel_tab_names’ filter we talked about last week on our Divi Hooks Series post. We have already seen how to add a new custom tab but now we want to see how to populate this with custom options boosting so the power of our customization.
So, let’s get started!
WE RECAP
Last Divi Hooks post we focused on the way we can add a custom tab to the Divi Theme Options (that is the old epanel). We simply said we just have to open our Child Theme’s functions.php file and add the following lines of code in order to append a new ‘Custom’ tab just after the last one (actually the ‘Updates’ one):
The ‘Custom’ tab is here, but what we have to do in order to populate it? A simple filter will be no more sufficient!
Let’s take a look at how we can add custom options to an existing tab before and then we’ll move to our main goal: add custom options to a new custom tab.
ADD CUSTOM OPTIONS TO AN EXISTING TAB
About the first case we already found a good post on internet by Scott McGrath of Scrawlon.com and we report below his code.
First of all we have to create a new file in which we will store our new custom options. This step is valid and necessary either for adding options to an existing tab either for adding those to a new custom one. So we create a new folder called ‘epanel’ in our Child Theme root and then we add a new file and we call this ‘custom_options_divi.php’; inside of it we add the following code in order to add four custom options after the ‘Show RSS Icon’ one under the General tab:
Now we come back to our functions.php and we add the following code in order to load our new custom options file using the action hook ‘after theme setup’:
ADD CUSTOM OPTIONS TO CUSTOM TAB
Perfect. This is great. But what if you want to create a separate tab and then populate this with custom options? The first step is the same, we have to add a custom options file locating this in a folder called ‘epanel’.
The code inside, however, is a bit different and even easier:
You can obviosly change “wrap-custom” to “wrap-[the name you want]” according to the tab name. So this step is really important: the name in “wrap-[…]” must be the same you will give your custom tab in the following code we will add to our functions.php file:
You have, as we said, also in this case use the ‘after theme setup’ action hook for loading our custom options file (as we did above) and remember you can change the position of your custom tab simply by changing the number ‘7’ (that is the offset) in the two lines of code that contain array_slice.
FINAL THOUGHTS
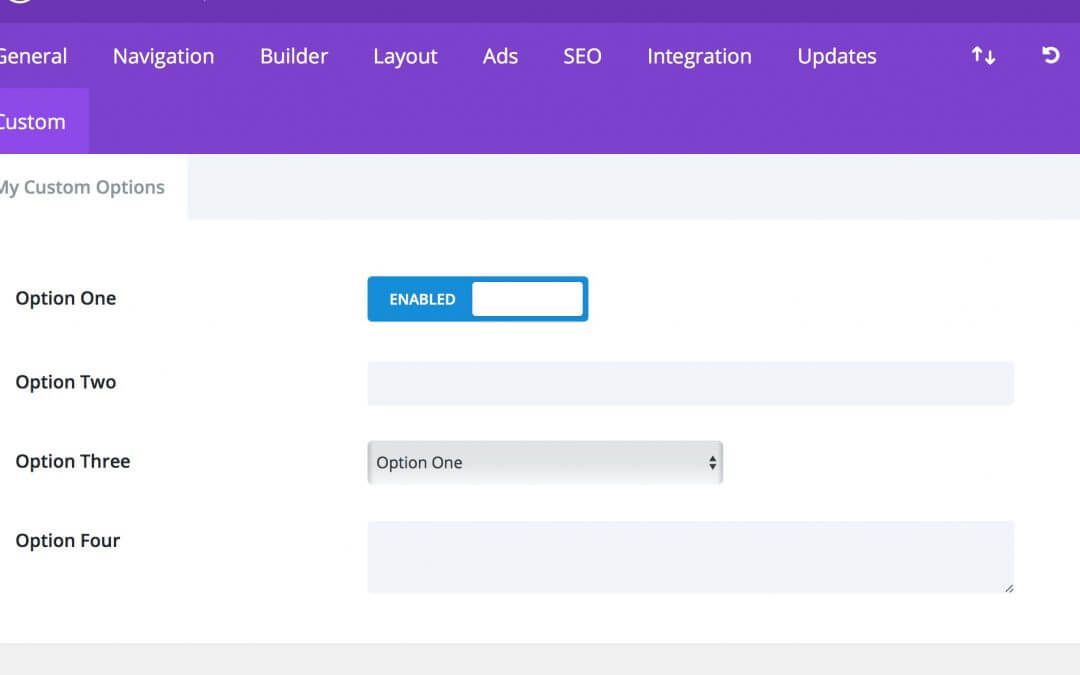
All done! Now we have our custom options under a new custom tab. You can customize as you want the options, you can add text, textarea, upload, checkboxes, select inputs and so on and you can customize the descriptions that will appear when the user will click on the question mark on the right. In a word, you have now full control on how your Divi Theme options and your custom tab will appear and this can look very professional if you are developing some Divi Plugin for example or a Divi Child Theme or just for your personal customizations.
All the new options will be properly saved but on how to use the saved values for customize concretely your Divi Theme we will focus on the next tuesday.
Hope it can be useful, let us know in the comments below.
Cheers!


