
DIVI POST SETTINGS INDEX
You are here!
You are here!
You are here!
You are here!
Divi Post Settings Plugin I
How to set the basics of a Wordpress and Divi Plugin.
Divi Post Settings Plugin II
Add Settings in Theme Customizer and Save the values.
Divi Post Settings Plugin III
Write our main functions and use our settings.
Divi Post Settings Plugin I V
Add Ajax to our Info notice, Testing and Commenting.
So the first thing we have to do – it is very important! – is to have a clear idea of what result we want to get; so, which tasks, exactly, our plugin must do.
THE PROBLEM
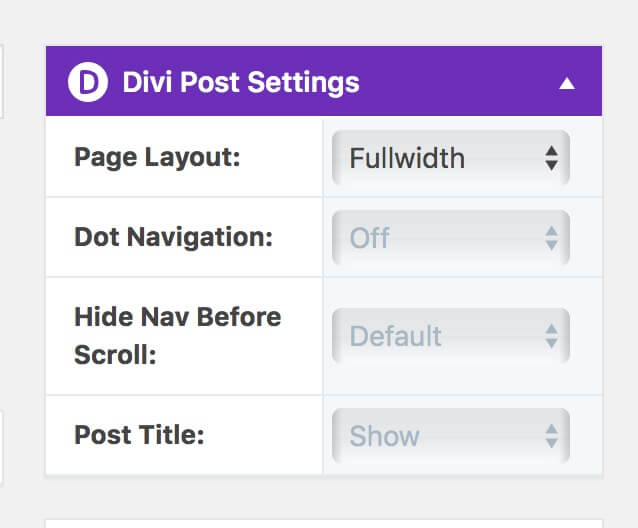
This is in short the scenario. Every time you go into the Post editor in Divi you see on the top-right a metabox called Divi Post Settings from which you can set in order:
– Positioning of the Sidebar on the left or right (or make Fullwidth the post)
– Enabling the Dot Navigation
– Enabling the Divi Menu appearing only after scrolls
– Showing or hiding the Post title
So, let’s say that we want to write our blog with Fullwidth posts and the Dot Navigation enabled. We will write this way every post in our website blog and, of course, we will have to set these two options every time we access the editor and hit a new post.
This is just an example but you might need also more options to customize everytime you create a post.
THE FOUR P: PLAN, PREPARE, PERFORM and PERFECT
Every time we have a problem we can choose to take it under the lens of the four P’s of Problem Solving. Four simple steps from the very initial state of Problem to the ultimate solution. We will do this approach in order to write our WordPress plugin.
PLAN
So what the plugin have to do is simply add some select fields in Divi Theme Options -> Layout -> Single Post Layout that will store our default options. Once you will save these default options, you will go in Post editor and the options will be already set as you prefer. If, however, for some reason you would write a post with a different layout all you have to do will be change the Divi Post Setting from inside the single post editor.
Starting, so, on how to ground a Divi Plugin and a WordPress Plugin in general. A Plugin is, in short, a functionality or more than one we will add to our WordPress website in a separate way, so that we can switch it on and off with a click ervery time we want.
There’s no one single way in order to create a WordPress Plugin. You can create a single main file or just a couple if your plugin is really simple or you can organize it in few folders and adopt a OOP (Object-Oriented Programming) approach using php Classes in order to have all your code better organized, more flexible and modular.
If you prefer this latter approach a good solution to get a preset plugin with all the dirty work already done and ready to be customized can be that of relying on an online service like WordPress Plugin Boilerplate ( we will talk about it in a future post ) that will handle all the stuffs and will create in few simple steps your plugin ground.
PREPARE
THE MAIN PLUGIN FILE
As we said every WordPress plugin – theoretically also the most complex one – just need a single php file in order to work. We will call our plugin “Divi Post Settings” so the only essential file we can’t do without wil be called:
divi_post_settings.php
and of course it will have the php syntax with an opening and closing tag.
However, the simple php file if empty does not let WordPress to recognize it as a plugin and this way you will not see – once loaded – your plugin in the Installed Plugin submenu of your WP Dashboard.
So to make it alive you need to add few commenting lines of code right below the opening php tag; these ones tell WordPress this is a plugin and give the main information that will be shown in Plugins -> Installed Plugins:
In order we set:
1) The plugin name: the name of the plugin as you prefer ( It is Required! )
2) The plugin url: an url to a plugin landing page ( It is Optional )
3) The plugin description: a short description concerning what your plugin does ( It is Optional but recommended )
4) The plugin author: your name or that of your company ( Optional but recommended )
5) The plugin version: the version number usually starting from 1.0 or similar (Optional but recommended)
6) The author url: an url to the author website or page ( It is Optional )
Well. Our plugin now will be already working and after loaded you’ll find it in the plugin list in dashboard going to Plugins -> Installed Plugins. You can also going to activate it and the green message about a success activation will appear at the top of the page; however, is quite obvious, the plugin still do anything.
Before we jump into the real code creation, there will be other few files that are recommended, even though not strictly required:
the README.txt file
the LICENSE.txt file
the ASSETS folder
So give them a quick look starting from the Readme.txt file, the most important one:
For what concerns the License file you can find it here or at WordPress.org also. Simply copy and paste it in a .txt file and include it in the main plugin folder together with the Readme.txt and the main plugin file.
Finally can be useful – for the most complex and wider plugins overall – include in our plugin an Assets folder in which we’ll put all the pictures our plugin need, from those eventually included in the Readme file to the icons and more.
Also other folders and files can be useful and appropriate as like as the Languages folder, Admin and Public folders, Includes one and so on; however for the time being these are enough.
Obviously our plugin needs Divi installed and active in order to work. So is not a bad idea let the user active it only if Divi theme is active. In our case, however, for ease we will just alert the user that the plugin needs Divi to be active if it is not.
We take advantage of the ‘function_exists()’ function and then we check if Divi is active thanks to ‘wp_get_theme()’ that tells us what is the current theme active and the “get(‘Name’)” and “get(‘Template’)” properties. So if Divi theme or a Divi child theme is active the plugin become active with a success message otherwise the plugin become active too but an error message is displayed alerting that Divi theme is required in order to get the plugin working.
Then we hook our function with the ‘after_setup_theme’ so that the theme itself has been loaded before that WordPress going to check if Divi is active.
That’s it. At this point we have our very basic plugin already set and working. If someone try to access the plugin directly have a blank page that tells the user doesn’t have permissions and if the plugin is activated with a different theme than Divi (or Divi child theme) an error message is displayed saying thad Divi theme is requiredin order to get the plugin working.
So let’s continue with Perform step in the next post. Stay tuned!
DIVI POST SETTINGS INDEX
You are here!
You are here!
You are here!
You are here!
Divi Post Settings Plugin I
How to set the basics of a Wordpress and Divi Plugin.
Divi Post Settings Plugin II
Add Settings in Theme Customizer and Save the values.
Divi Post Settings Plugin III
Write our main functions and use our settings.
Divi Post Settings Plugin I V
Add Ajax to our Info notice, Testing and Commenting.


