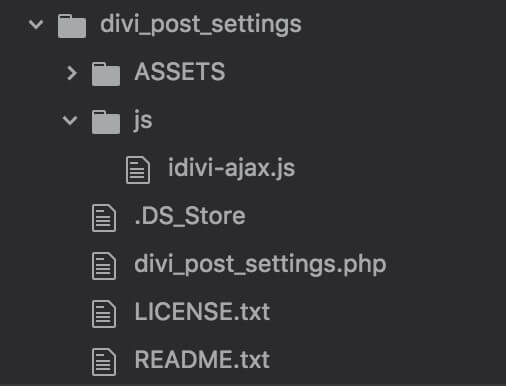
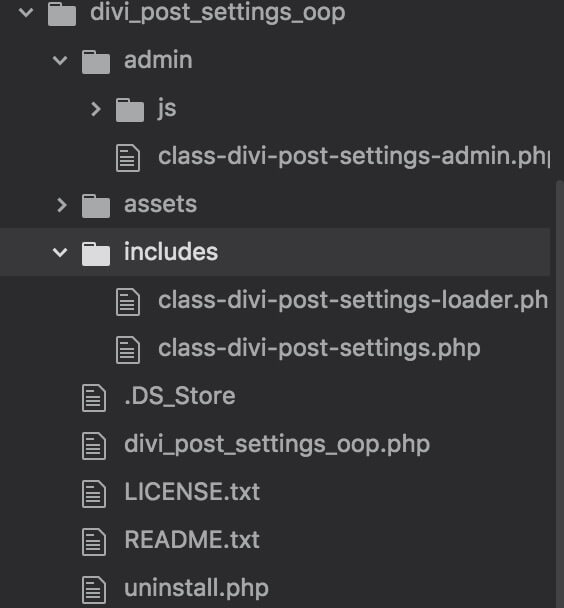
<?php
/*
 * Plugin Name: Divi Post Settings
 * Plugin URI: https://howidivit.com/divi_post_settings
 * Description: The plugin add some fields in Divi Theme Options for setting your favorite default post settings.
 * Author: Dan Mardis - Howidivit.com
 * Version: 1.0
 * Author URI: https://howidivit.com
 */

 // Prevent file from being loaded directly
 if ( ! defined( 'WPINC' ) ) {
 die( 'Sorry. No sufficient permissions.' );
 }

 /*
 * If Divi is not active alert the user the plugin need Divi in order to work
 */
 if ( ! function_exists( 'et_divi_theme_is_active' ) ) {
 function et_divi_theme_is_active() {
 $current_theme = wp_get_theme();
 if ( 'Divi' === $current_theme->get( 'Name' ) || 'Divi' === $current_theme->get( 'Template' ) ) {
 return true;
 }
 echo '<div class="error"><p>You need to have Divi theme active! Divi Post Settings depends from Divi.</p></div>';
 }
 }
 add_action( 'after_setup_theme', 'et_divi_theme_is_active');

/*
 * Update 'idivi_dismiss' user option when deactivate the plugin
 */
function idivi_deactivation() {
 $user_id = get_current_user_id();
 update_user_option( $user_id, "idivi-dismiss", '' );
}
register_deactivation_hook( __FILE__, 'idivi_deactivation' );

/*
 * Enqueue and localize idivi-ajax script
 */
function idivi_enqueue_scripts() {
 wp_enqueue_script('idivi-ajax', plugin_dir_url(__FILE__) . 'js/idivi-ajax.js', array('jquery'), '1.0');
 wp_localize_script('idivi-ajax', 'idivi_vars', array(
 'idivi_nonce' => wp_create_nonce('idivi-nonce')
 )
 );
}
add_action( 'admin_enqueue_scripts', 'idivi_enqueue_scripts' );

/*
 * Show custom info notice (permanently dismissible) when the plugin is activated
 */
function idivi_user_info() {
 $user_id = get_current_user_id();
 $idivi_dismiss = get_user_option("idivi-dismiss", $user_id);
 if ( $idivi_dismiss != 'dismissed') {
 echo '<div class="notice notice-info idivi-notice is-dismissible" data-notice-id="idivi-notice"><p>You need to go to the Theme Customizer in order to set your preferences!</p></div>';
 }
}
add_action( 'admin_notices', 'idivi_user_info');

/*
 * Process Ajax request updating 'idivi-dismiss' user option
 */
function idivi_process_ajax() {
 $user_id = get_current_user_id();
 if( !isset( $_POST['idivi_nonce'] ) || !wp_verify_nonce($_POST['idivi_nonce'], 'idivi-nonce') )
 die('Permissions check failed');
 update_user_option( $user_id, "idivi-dismiss", 'dismissed' );
 die();
}
add_action( 'wp_ajax_idivi_dismiss', 'idivi_process_ajax' );

/*
 * Add options to the Theme Customizer (Blog panel)
 */
function idivi_post_settings_options($wp_customize) {
$wp_customize->add_section('idivi_post_settings_section', array(
 'title' => __('Divi Post Settings', idivi_post_settings),
 'panel' => 'et_divi_blog_settings',
 ));
 $wp_customize->add_setting('idivi_post_settings_sidebar', array(
 'default' => 'Right',
 'type' => 'option',
 'capability' => 'edit_theme_options',
 ));
 $wp_customize->add_control('idivi_post_settings_layout', array(
 'label' => __('Page Layout', idivi_post_settings),
 'section' => 'idivi_post_settings_section',
 'type' => 'select',
 'choices' => array(
 'Right' => 'Right Sidebar',
 'Left' => 'Left Sidebar',
 'Full' => 'Fullwidth',
 ),
 'priority' => 5,
 'settings' => 'idivi_post_settings_sidebar'
 ));
 $wp_customize->add_setting('idivi_post_settings_dot', array(
 'default' => 'Off',
 'type' => 'option',
 'capability' => 'edit_theme_options',
 ));
 $wp_customize->add_control('idivi_post_settings_dot_nav', array(
 'label' => __('Dot Navigation', idivi_post_settings),
 'section' => 'idivi_post_settings_section',
 'type' => 'select',
 'choices' => array(
 'Off' => 'Off',
 'On' => 'On',
 ),
 'priority' => 5,
 'settings' => 'idivi_post_settings_dot'
 ));
 $wp_customize->add_setting('idivi_post_settings_before_scroll', array(
 'default' => 'Default',
 'type' => 'option',
 'capability' => 'edit_theme_options',
 ));
 $wp_customize->add_control('idivi_post_settings_hide_before_scroll', array(
 'label' => __('Hide Nav Before Scroll', idivi_post_settings),
 'section' => 'idivi_post_settings_section',
 'type' => 'select',
 'choices' => array(
 'Default' => 'Default',
 'Off' => 'Off',
 'On' => 'On',
 ),
 'priority' => 5,
 'settings' => 'idivi_post_settings_before_scroll'
 ));
 $wp_customize->add_setting('idivi_post_settings_post_title', array(
 'default' => 'Show',
 'type' => 'option',
 'capability' => 'edit_theme_options',
 ));
 $wp_customize->add_control('idivi_post_settings_post_title_show', array(
 'label' => __('Post Title', idivi_post_settings),
 'section' => 'idivi_post_settings_section',
 'type' => 'select',
 'choices' => array(
 'Show' => 'Show',
 'Hide' => 'Hide',
 ),
 'priority' => 5,
 'settings' => 'idivi_post_settings_post_title'
 ));
}
add_action('customize_register', 'idivi_post_settings_options');

/*
 * Rewrite the settings meta box Divi function according to the Theme Customizer options
 */
if ( ! function_exists( 'et_single_settings_meta_box' ) ) :

 function et_single_settings_meta_box( $post ) {
 $post_id = get_the_ID();
 $page_layout_opt = get_option( 'idivi_post_settings_sidebar' );
 $dot_nav_opt = get_option( 'idivi_post_settings_dot' );
 $before_scroll_opt = get_option( 'idivi_post_settings_before_scroll' );
 $title_opt = get_option( 'idivi_post_settings_post_title' );

 wp_nonce_field( basename( __FILE__ ), 'et_settings_nonce' );

 $page_layout = get_post_meta( $post_id, '_et_pb_page_layout', true );
 $side_nav = get_post_meta( $post_id, '_et_pb_side_nav', true );
 $project_nav = get_post_meta( $post_id, '_et_pb_project_nav', true );
 $post_hide_nav = get_post_meta( $post_id, '_et_pb_post_hide_nav', true );
 $post_hide_nav = $post_hide_nav && 'off' === $post_hide_nav ? 'default' : $post_hide_nav;
 $show_title = get_post_meta( $post_id, '_et_pb_show_title', true );

 if ( !$page_layout_opt || $page_layout_opt === 'Right') {
 if ( is_rtl() ) {
 $page_layouts = array(
 'et_left_sidebar' => esc_html__( 'Left Sidebar', 'Divi' ),
 'et_right_sidebar' => esc_html__( 'Right Sidebar', 'Divi' ),
 'et_full_width_page' => esc_html__( 'Fullwidth', 'Divi' ),
 );
 } else {
 $page_layouts = array(
 'et_right_sidebar' => esc_html__( 'Right Sidebar', 'Divi' ),
 'et_left_sidebar' => esc_html__( 'Left Sidebar', 'Divi' ),
 'et_full_width_page' => esc_html__( 'Fullwidth', 'Divi' ),
 );
 }
 } else if ( $page_layout_opt === 'Left' ) {
 if ( is_rtl() ) {
 $page_layouts = array(
 'et_right_sidebar' => esc_html__( 'Right Sidebar', 'Divi' ),
 'et_left_sidebar' => esc_html__( 'Left Sidebar', 'Divi' ),
 'et_full_width_page' => esc_html__( 'Fullwidth', 'Divi' ),
 );
 } else {
 $page_layouts = array(
 'et_left_sidebar' => esc_html__( 'Left Sidebar', 'Divi' ),
 'et_right_sidebar' => esc_html__( 'Right Sidebar', 'Divi' ),
 'et_full_width_page' => esc_html__( 'Fullwidth', 'Divi' ),
 );
 }
 } else {
 if ( is_rtl() ) {
 $page_layouts = array(
 'et_full_width_page' => esc_html__( 'Fullwidth', 'Divi' ),
 'et_left_sidebar' => esc_html__( 'Left Sidebar', 'Divi' ),
 'et_right_sidebar' => esc_html__( 'Right Sidebar', 'Divi' ),
 );
 } else {
 $page_layouts = array(
 'et_full_width_page' => esc_html__( 'Fullwidth', 'Divi' ),
 'et_right_sidebar' => esc_html__( 'Right Sidebar', 'Divi' ),
 'et_left_sidebar' => esc_html__( 'Left Sidebar', 'Divi' ),
 );
 }
 }
 $layouts = array(
 'light' => esc_html__( 'Light', 'Divi' ),
 'dark' => esc_html__( 'Dark', 'Divi' ),
 );
 $post_bg_color = ( $bg_color = get_post_meta( $post_id, '_et_post_bg_color', true ) ) && '' !== $bg_color
 ? $bg_color
 : '#ffffff';
 $post_use_bg_color = get_post_meta( $post_id, '_et_post_use_bg_color', true )
 ? true
 : false;
 $post_bg_layout = ( $layout = get_post_meta( $post_id, '_et_post_bg_layout', true ) ) && '' !== $layout
 ? $layout
 : 'light'; ?>

 <p class="et_pb_page_settings et_pb_page_layout_settings">
 <label for="et_pb_page_layout" style="display: block; font-weight: bold; margin-bottom: 5px;"><?php esc_html_e( 'Page Layout', 'Divi' ); ?>: </label>

 <select id="et_pb_page_layout" name="et_pb_page_layout">
 <?php
 foreach ( $page_layouts as $layout_value => $layout_name ) {
 printf( '<option value="%2$s"%3$s>%1$s</option>',
 esc_html( $layout_name ),
 esc_attr( $layout_value ),
 selected( $layout_value, $page_layout, false )
 );
 } ?>
 </select>
 </p>
 <p class="et_pb_page_settings et_pb_side_nav_settings" style="display: none;">
 <label for="et_pb_side_nav" style="display: block; font-weight: bold; margin-bottom: 5px;"><?php esc_html_e( 'Dot Navigation', 'Divi' ); ?>: </label>

 <?php if ( !$dot_nav_opt || $dot_nav_opt === 'Off') { ?>
 <select id="et_pb_side_nav" name="et_pb_side_nav">
 <option value="off" <?php selected( 'off', $side_nav ); ?>><?php esc_html_e( 'Off', 'Divi' ); ?></option>
 <option value="on" <?php selected( 'on', $side_nav ); ?>><?php esc_html_e( 'On', 'Divi' ); ?></option>
 </select>
 <?php } else { ?>
 <select id="et_pb_side_nav" name="et_pb_side_nav">
 <option value="on" <?php selected( 'on', $side_nav ); ?>><?php esc_html_e( 'On', 'Divi' ); ?></option>
 <option value="off" <?php selected( 'off', $side_nav ); ?>><?php esc_html_e( 'Off', 'Divi' ); ?></option>
 </select>
 <?php } ?>
 </p>
 <p class="et_pb_page_settings">
 <label for="et_pb_post_hide_nav" style="display: block; font-weight: bold; margin-bottom: 5px;"><?php esc_html_e( 'Hide Nav Before Scroll', 'Divi' ); ?>: </label>

 <?php if ( !$before_scroll_opt || $before_scroll_opt === 'Default') { ?>
 <select id="et_pb_post_hide_nav" name="et_pb_post_hide_nav">
 <option value="default" <?php selected( 'default', $post_hide_nav ); ?>><?php esc_html_e( 'Default', 'Divi' ); ?></option>
 <option value="no" <?php selected( 'no', $post_hide_nav ); ?>><?php esc_html_e( 'Off', 'Divi' ); ?></option>
 <option value="on" <?php selected( 'on', $post_hide_nav ); ?>><?php esc_html_e( 'On', 'Divi' ); ?></option>
 </select>
 <?php } else if ( $before_scroll_opt === 'Off' ) { ?>
 <select id="et_pb_post_hide_nav" name="et_pb_post_hide_nav">
 <option value="no" <?php selected( 'no', $post_hide_nav ); ?>><?php esc_html_e( 'Off', 'Divi' ); ?></option>
 <option value="default" <?php selected( 'default', $post_hide_nav ); ?>><?php esc_html_e( 'Default', 'Divi' ); ?></option>
 <option value="on" <?php selected( 'on', $post_hide_nav ); ?>><?php esc_html_e( 'On', 'Divi' ); ?></option>
 </select>
 <?php } else { ?>
 <select id="et_pb_post_hide_nav" name="et_pb_post_hide_nav">
 <option value="on" <?php selected( 'on', $post_hide_nav ); ?>><?php esc_html_e( 'On', 'Divi' ); ?></option>
 <option value="default" <?php selected( 'default', $post_hide_nav ); ?>><?php esc_html_e( 'Default', 'Divi' ); ?></option>
 <option value="no" <?php selected( 'no', $post_hide_nav ); ?>><?php esc_html_e( 'Off', 'Divi' ); ?></option>
 </select>
 <?php } ?>
 </p>

 <?php if ( 'post' === $post->post_type ) : ?>
 <p class="et_pb_page_settings et_pb_single_title" style="display: none;">
 <label for="et_single_title" style="display: block; font-weight: bold; margin-bottom: 5px;"><?php esc_html_e( 'Post Title', 'Divi' ); ?>: </label>

 <?php if ( !$title_opt || $title_opt === 'Show') { ?>
 <select id="et_single_title" name="et_single_title">
 <option value="on" <?php selected( 'on', $show_title ); ?>><?php esc_html_e( 'Show', 'Divi' ); ?></option>
 <option value="off" <?php selected( 'off', $show_title ); ?>><?php esc_html_e( 'Hide', 'Divi' ); ?></option>
 </select>
 <?php } else { ?>
 <select id="et_single_title" name="et_single_title">
 <option value="off" <?php selected( 'off', $show_title ); ?>><?php esc_html_e( 'Hide', 'Divi' ); ?></option>
 <option value="on" <?php selected( 'on', $show_title ); ?>><?php esc_html_e( 'Show', 'Divi' ); ?></option>
 </select>
 <?php } ?>
 </p>

 <p class="et_divi_quote_settings et_divi_audio_settings et_divi_link_settings et_divi_format_setting et_pb_page_settings">
 <label for="et_post_use_bg_color" style="display: block; font-weight: bold; margin-bottom: 5px;"><?php esc_html_e( 'Use Background Color', 'Divi' ); ?></label>
 <input name="et_post_use_bg_color" type="checkbox" id="et_post_use_bg_color" <?php checked( $post_use_bg_color ); ?> />
 </p>

 <p class="et_post_bg_color_setting et_divi_format_setting et_pb_page_settings">
 <input id="et_post_bg_color" name="et_post_bg_color" class="color-picker-hex" type="text" maxlength="7" placeholder="<?php esc_attr_e( 'Hex Value', 'Divi' ); ?>" value="<?php echo esc_attr( $post_bg_color ); ?>" data-default-color="#ffffff" />
 </p>

 <p class="et_divi_quote_settings et_divi_audio_settings et_divi_link_settings et_divi_format_setting">
 <label for="et_post_bg_layout" style="font-weight: bold; margin-bottom: 5px;"><?php esc_html_e( 'Text Color', 'Divi' ); ?>: </label>
 <select id="et_post_bg_layout" name="et_post_bg_layout">
 <?php
 foreach ( $layouts as $layout_name => $layout_title )
 printf( '<option value="%s"%s>%s</option>',
 esc_attr( $layout_name ),
 selected( $layout_name, $post_bg_layout, false ),
 esc_html( $layout_title )
 );
 ?>
 </select>
 </p>
 <?php endif;

 if ( 'project' === $post->post_type ) : ?>
 <p class="et_pb_page_settings et_pb_project_nav" style="display: none;">
 <label for="et_project_nav" style="display: block; font-weight: bold; margin-bottom: 5px;"><?php esc_html_e( 'Project Navigation', 'Divi' ); ?>: </label>

 <select id="et_project_nav" name="et_project_nav">
 <option value="off" <?php selected( 'off', $project_nav ); ?>><?php esc_html_e( 'Hide', 'Divi' ); ?></option>
 <option value="on" <?php selected( 'on', $project_nav ); ?>><?php esc_html_e( 'Show', 'Divi' ); ?></option>
 </select>
 </p>
 <?php endif;
 }
endif;

/*
 * Save the Theme Customizer options
 */
 if ( ! function_exists( 'idivi_divi_post_settings_save_details' ) ) :
 function idivi_divi_post_settings_save_details( $post_id, $post ){
 global $pagenow;

 if ( 'post.php' !== $pagenow || ! $post || ! is_object( $post ) ) {
return;
 }

 if ( defined( 'DOING_AUTOSAVE' ) && DOING_AUTOSAVE ) {
return;
 }

 $post_type = get_post_type_object( $post->post_type );
 if ( ! current_user_can( $post_type->cap->edit_post, $post_id ) ) {
return;
 }

 if ( ! isset( $_POST['et_settings_nonce'] ) || ! wp_verify_nonce( $_POST['et_settings_nonce'], basename( __FILE__ ) ) ) {
return;
 }

if ( isset( $_POST['et_post_use_bg_color'] ) )
update_post_meta( $post_id, '_et_post_use_bg_color', true );
else
delete_post_meta( $post_id, '_et_post_use_bg_color' );

if ( isset( $_POST['et_post_bg_color'] ) )
update_post_meta( $post_id, '_et_post_bg_color', sanitize_text_field( $_POST['et_post_bg_color'] ) );
else
delete_post_meta( $post_id, '_et_post_bg_color' );

if ( isset( $_POST['et_post_bg_layout'] ) )
update_post_meta( $post_id, '_et_post_bg_layout', sanitize_text_field( $_POST['et_post_bg_layout'] ) );
else
delete_post_meta( $post_id, '_et_post_bg_layout' );

if ( isset( $_POST['et_single_title'] ) )
update_post_meta( $post_id, '_et_pb_show_title', sanitize_text_field( $_POST['et_single_title'] ) );
else
delete_post_meta( $post_id, '_et_pb_show_title' );

if ( isset( $_POST['et_pb_post_hide_nav'] ) )
update_post_meta( $post_id, '_et_pb_post_hide_nav', sanitize_text_field( $_POST['et_pb_post_hide_nav'] ) );
else
delete_post_meta( $post_id, '_et_pb_post_hide_nav' );

if ( isset( $_POST['et_project_nav'] ) )
update_post_meta( $post_id, '_et_pb_project_nav', sanitize_text_field( $_POST['et_project_nav'] ) );
else
delete_post_meta( $post_id, '_et_pb_project_nav' );

if ( isset( $_POST['et_pb_page_layout'] ) ) {
update_post_meta( $post_id, '_et_pb_page_layout', sanitize_text_field( $_POST['et_pb_page_layout'] ) );
} else {
delete_post_meta( $post_id, '_et_pb_page_layout' );
}

if ( isset( $_POST['et_pb_side_nav'] ) ) {
update_post_meta( $post_id, '_et_pb_side_nav', sanitize_text_field( $_POST['et_pb_side_nav'] ) );
} else {
delete_post_meta( $post_id, '_et_pb_side_nav' );
}
}
endif;
add_action( 'save_post', 'idivi_divi_post_settings_save_details', 10, 2 );

?>


