LET’S WRITE OUR NEW SETTINGS
So let’s dive into the code. We can do all that we need just with a couple of functions and filters in our main plugin file. We will write our first function in which we set our custom $fields and then, at the bottom of the function we will merge these ones with the existing module $fields:
function idaa_add_audio_settings($fields_unprocessed) {

$fields = [];
$fields['image_width'] = [
'label' => 'Image Width',
'type' => 'range',
'option_category' => 'configuration',
'description' => 'Set the Width of the featured image.',
'mobile_options' => true,
'default_on_child' => true,
'validate_unit' => true,
'default' => '35%',
'default_tablet' => '100%',
'default_unit' => '%',
'allow_empty' => true,
'range_settings' => array(
'min' => '0',
'max' => '100',
'step' => '1',
),
'toggle_slug' => 'image'
];
$fields['audio_margin'] = [
'label' => 'Audio Timeline Margin',
'type' => 'range',
'option_category' => 'configuration',
'description' => 'Set the Margin of the Audio timeline.',
'mobile_options' => true,
'default_on_child' => true,
'validate_unit' => true,
'default' => '220px',
'default_tablet' => '220px',
'default_unit' => 'px',
'allow_empty' => true,
'range_settings' => array(
'min' => '160',
'max' => '360',
'step' => '1',
),
'toggle_slug' => 'audio'
];
$fields['play_color'] = [
'label' => 'Player Color',
'type' => 'color-alpha',
'option_category' => 'configuration',
'default' => '#ffffff',
'description' => 'Choose the color of the Play button.',
'tab_slug' => 'advanced'
];
$fields['volume_color'] = [
'label' => 'Volume Color',
'type' => 'color-alpha',
'option_category' => 'configuration',
'default' => '#ffffff',
'description' => 'Choose the color of the Volume button.',
'tab_slug' => 'advanced'
];
$fields['timer_color'] = [
'label' => 'Timer Color',
'type' => 'color-alpha',
'option_category' => 'configuration',
'default' => '#ffffff',
'description' => 'Choose the color of Timer.',
'tab_slug' => 'advanced'
];
$fields['time_slider_color'] = [
'label' => 'Time Slider Color',
'type' => 'color-alpha',
'option_category' => 'configuration',
'default' => '#ffffff',
'description' => 'Choose the color of the Time Slider.',
'tab_slug' => 'advanced'
];
$fields['current_time_slider_color'] = [
'label' => 'Current Time Slider Color',
'type' => 'color-alpha',
'option_category' => 'configuration',
'default' => '#ffffff',
'description' => 'Choose the color of the Time Slider at current point.',
'tab_slug' => 'advanced'
];
$fields['volume_slider_color'] = [
'label' => 'Volume Slider Color',
'type' => 'color-alpha',
'option_category' => 'configuration',
'default' => '#ffffff',
'description' => 'Choose the color of the Volume Slider.',
'tab_slug' => 'advanced'
];
$fields['current_volume_slider_color'] = [
'label' => 'Current Volume Slider Color',
'type' => 'color-alpha',
'option_category' => 'configuration',
'default' => '#ffffff',
'description' => 'Choose the color of the Volume Slider at current point.',
'tab_slug' => 'advanced'
];
$fields['handle_size'] = [
'label' => 'Handle Size',
'type' => 'range',
'option_category' => 'configuration',
'description' => 'Set the Size of the Time Handle.',
'mobile_options' => true,
'default_on_child' => true,
'validate_unit' => true,
'default' => '1',
'default_tablet' => '1',
'default_unit' => '',
'allow_empty' => true,
'range_settings' => array(
'min' => '0',
'max' => '3',
'step' => '.1',
),
'tab_slug' => 'advanced'
];
$fields['handle_hover_size'] = [
'label' => 'Handle Hover Size',
'type' => 'range',
'option_category' => 'configuration',
'description' => 'Set the Size of the Time Handle on hovering.',
'mobile_options' => true,
'default_on_child' => true,
'validate_unit' => true,
'default' => '1',
'default_tablet' => '1',
'default_unit' => '',
'allow_empty' => true,
'range_settings' => array(
'min' => '0',
'max' => '3',
'step' => '.1',
),
'tab_slug' => 'advanced'
];
$fields['time_handle_border_radius'] = [
'label' => 'Handle Border Radius',
'type' => 'range',
'option_category' => 'configuration',
'description' => 'Set the Border Radius of the Time Handle.',
'default_on_child' => true,
'validate_unit' => true,
'default' => '100%',
'default_unit' => '%',
'allow_empty' => true,
'range_settings' => array(
'min' => '1',
'max' => '100',
'step' => '1',
),
'tab_slug' => 'advanced'
];
$fields['time_handle_color'] = [
'label' => 'Time Handle Color',
'type' => 'color-alpha',
'option_category' => 'configuration',
'default' => 'antiquewhite',
'description' => 'Choose the color of the Time Handle.',
'tab_slug' => 'advanced'
];
$fields['time_handle_border_color'] = [
'label' => 'Time Handle Border Color',
'type' => 'color-alpha',
'option_category' => 'configuration',
'default' => '#ffffff',
'description' => 'Choose the color of the Time Handle border.',
'tab_slug' => 'advanced'
];

return array_merge($fields_unprocessed, $fields);

}
So we added several fields like the Image Width (in Content->Image), the Margin of the Audio (in Content->Audio) and a lot of styles about the color of buttons, timer and sliders, the size, color and border-radius of the handle, all wrapped in a new ‘Audio’ toggle in the Design tab. Then we simply add the proper filter:
Next we will write another function in which a) first check for the slug of the module, b) we store our field values (thanks to the $module->props[‘field_value’]) and c) we will modify our Html output:
function idaa_render_audio_settings($output, $render_slug, $module) {
if('et_pb_audio' !== $render_slug) return $output;
 if ( is_array( $output ) ) {
 return $output;
 }

 $defaultWidth = '35%';
 $defaultMargin = '220px';
 $defaultColor = '#ffffff';
 $defaultHandleSize = '1';
 $defaultBorderColor = 'antiquewhite';
 $defaultBorderRadius = '100%';

 $imgWidth = $module->props['image_width'];
 $audioMargin = $module->props['audio_margin'];
 $playerColor = $module->props['play_color'];
 $volumeColor = $module->props['volume_color'];
 $timerColor = $module->props['timer_color'];
 $timeSliderColor = $module->props['time_slider_color'];
 $timeCurrentSliderColor = $module->props['current_time_slider_color'];
 $volSliderColor = $module->props['volume_slider_color'];
 $volCurrentSliderColor = $module->props['current_volume_slider_color'];
 $timeHandleColor = $module->props['time_handle_color'];
 $timeHandleBorderColor = $module->props['time_handle_border_color'];
 $timeHandleBorderRadius = $module->props['time_handle_border_radius'];
 $timeHandleSize = $module->props['handle_size'];
 $timeHandleHoverSize = $module->props['handle_hover_size'];

 if ($imgWidth !== $defaultWidth) {
$output .= sprintf( '<style>.et_pb_audio_cover_art{width:%1$s}</style>', $imgWidth
 );
 }
 if ($audioMargin !== $defaultMargin) {
$output .= sprintf( '<style>.et_pb_audio_module_content{margin-left:%1$s}</style>', $audioMargin
 );
 }
 if ($playerColor !== $defaultColor) {
 $output .= sprintf(
 '<style>.et_audio_container .mejs-playpause-button button:before{color:%1$s}</style>', $playerColor
 );
 }
 if ($volumeColor !== $defaultColor) {
 $output .= sprintf(
 '<style>.et_audio_container .mejs-volume-button button:before{color:%1$s}</style>', $volumeColor
 );
 }
 if ($timerColor !== $defaultColor) {
 $output .= sprintf(
 '<style>.et_audio_container .mejs-container .mejs-controls .mejs-time span{color:%1$s}</style>', $timerColor
 );
 }
 if ($timeSliderColor !== $defaultColor) {
 $output .= sprintf(
 '<style>.et_audio_container .mejs-controls .mejs-time-rail .mejs-time-total{background:%1$s}</style>', $timeSliderColor
 );
 }
 if ($timeCurrentSliderColor !== $defaultColor) {
 $output .= sprintf(
 '<style>.et_audio_container .mejs-controls .mejs-time-rail .mejs-time-current,.et_audio_container .mejs-controls .mejs-time-rail .mejs-time-handle {background:%1$s}</style>', $timeCurrentSliderColor
 );
 }
 if ($volSliderColor !== $defaultColor) {
 $output .= sprintf(
 '<style>.et_audio_container .mejs-controls .mejs-horizontal-volume-slider .mejs-horizontal-volume-total{background:%1$s}</style>', $volSliderColor
 );
 }
 if ($volCurrentSliderColor !== $defaultColor) {
 $output .= sprintf(
 '<style>.et_audio_container .mejs-controls .mejs-horizontal-volume-slider .mejs-horizontal-volume-current, .et_audio_container .mejs-controls .mejs-horizontal-volume-slider .mejs-horizontal-volume-handle {background:%1$s}</style>', $volCurrentSliderColor
 );
 }
 if ($timeHandleColor !== $defaultColor) {
 $output .= sprintf(
 '<style>.et_audio_container .mejs-time-rail .mejs-time-handle-content{background:%1$s}</style>', $timeHandleColor
 );
 }
 if ($timeHandleBorderColor !== $defaultBorderColor) {
 $output .= sprintf(
 '<style>.et_audio_container .mejs-time-handle-content{border-color:%1$s}</style>', $timeHandleBorderColor
 );
 }
 if ($timeHandleBorderRadius !== $defaultBorderRadius) {
 $output .= sprintf(
 '<style>.et_audio_container .mejs-time-rail .mejs-time-handle-content{border-radius:%1$s}</style>', $timeHandleBorderRadius
 );
 }
 if ($timeHandleSize !== $defaultHandleSize) {
 $output .= sprintf(
 '<style>.et_audio_container .mejs-time-rail .mejs-time-handle-content {transform:scale(%1$s)}</style>', $timeHandleSize
 );
 }
 if ($timeHandleHoverSize !== $defaultHandleSize) {
 $output .= sprintf(
 '<style>.et_audio_container .mejs-time-rail:hover .mejs-time-handle-content {transform:scale(%1$s)}</style>', $timeHandleHoverSize
 );
 }


return $output;

}
In our case we ensure that each field has been set and then filter the output adding a <style> with the needed Css inside. Obviously as final step we have to add the proper filter:
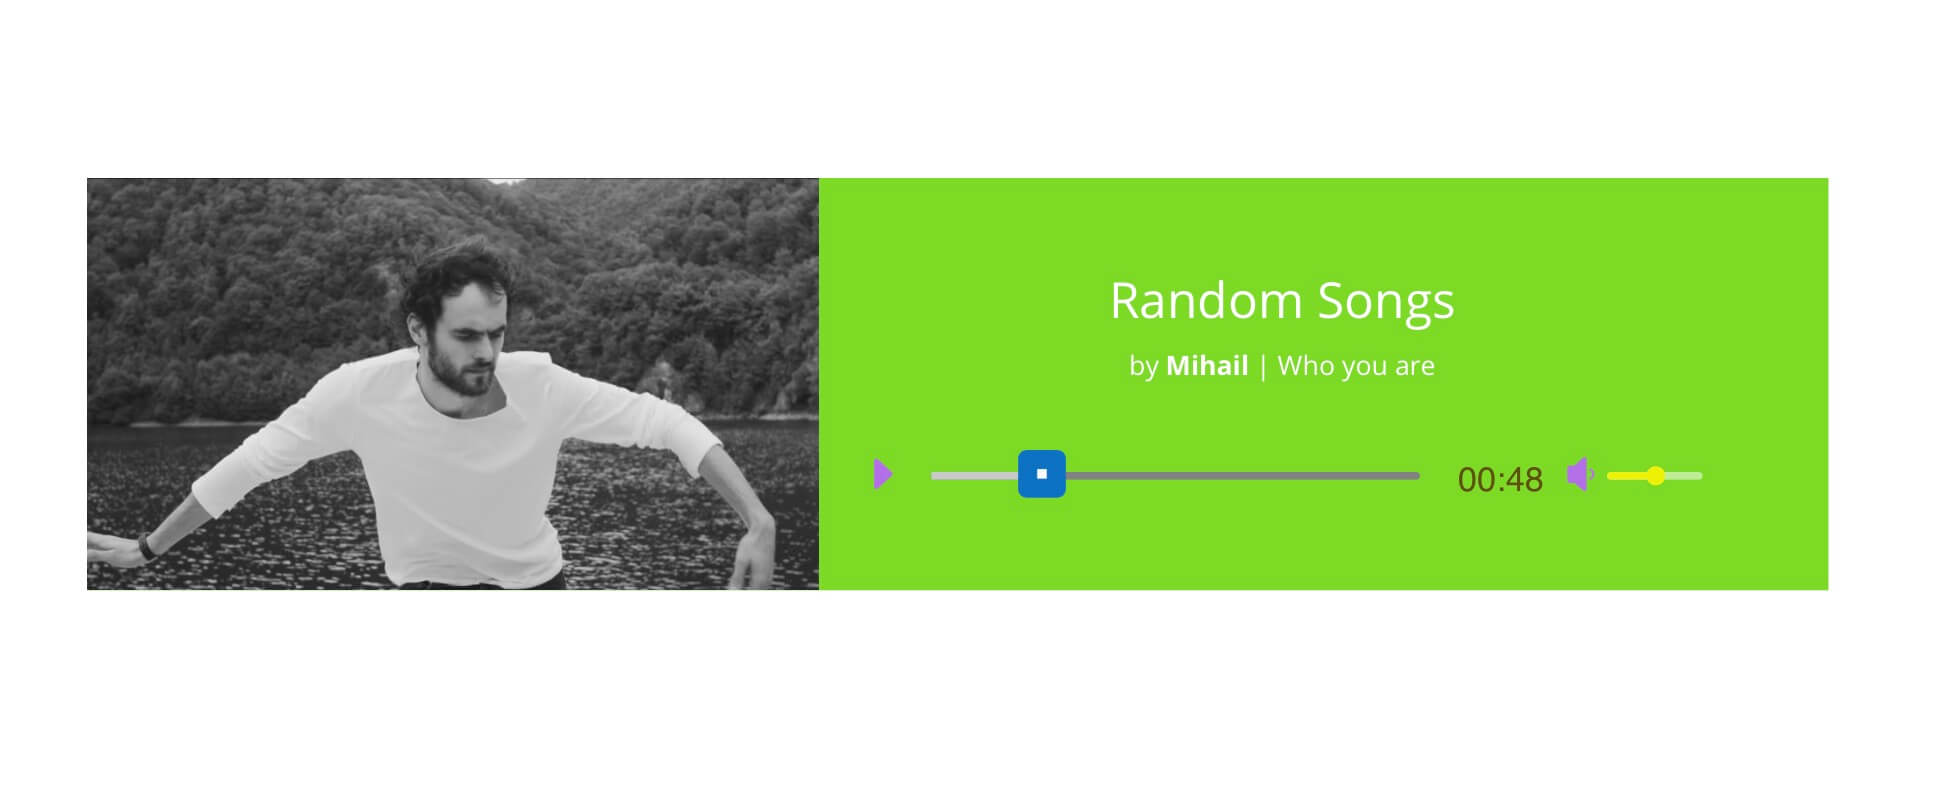
That’s all! Now we are able to get a result like this.
However, a couple of things to note. The first is that our custom fields will appear properly in the Visual Builder but these ones don’t render in VB; then another issue in our case has risen from the add <style>s to our module: this seems to cause a display error in the VB on refreshing the page without affecting anyway our Html output in published posts.


Hi,
Can you indicate which file the code above should be in. I am not 100% sure what the main plugin file is
Hi Stephen,
the main plugin file is that one located in the main directory of your plugin… if you have created your plugin using the Create Divi Extension tool this file will have the name of your plugin followed by .php. So in our case we have called our plugin “I Divi Advanced Audio” and our main plugin file name is ‘I-divi-advanced-audio.php’….
You can place your functions just below the ‘[prefix]_initialize_extension’ function you will find by default in your main plugin file.
NOTE: About the ‘idea_render_audio_settings()’ function i’ve updated a little the code in order to avoid a display issue when on the Visual Builder.. i will talk more about it in the next Series post 😉
I am creating a divi module. I need to know if I can render custom output that I am preparing in the render function to use in the react jsx file?
Hi Manoj, sure you can do it. However, obviously, rendering in the Jsx file (thus in React) can be – and often is – a bit more complicated and you should look to the React syntax to avoid issues (especially when your output is going to be more than some texts and images). You can stick with the React.js official documentation and also follow along with our Divi React series posts here on Howidivit… 😉