
Hi everyone, today we will see how to put in practice what we learned about the Lifecycle methods in React Js; in order to do it we will customize further our Author Card Divi custom module.
Let’s give a look at how we will do it!
LET’S RECAP
Let’s recap, we created a Divi custom module called Author Card in which we have just two custom Content fields, an Author Intro and an Author Description and in between the post author will automatically appears thanks to an Ajax call. We also added a purple background color circle at the top right corner of the module, we added some events like the clicking of the purple circle that lead to make visible a React color picker from which we can quickly change our module background.
REACT LIFECYCLE HOOKS IN OUR MODULE
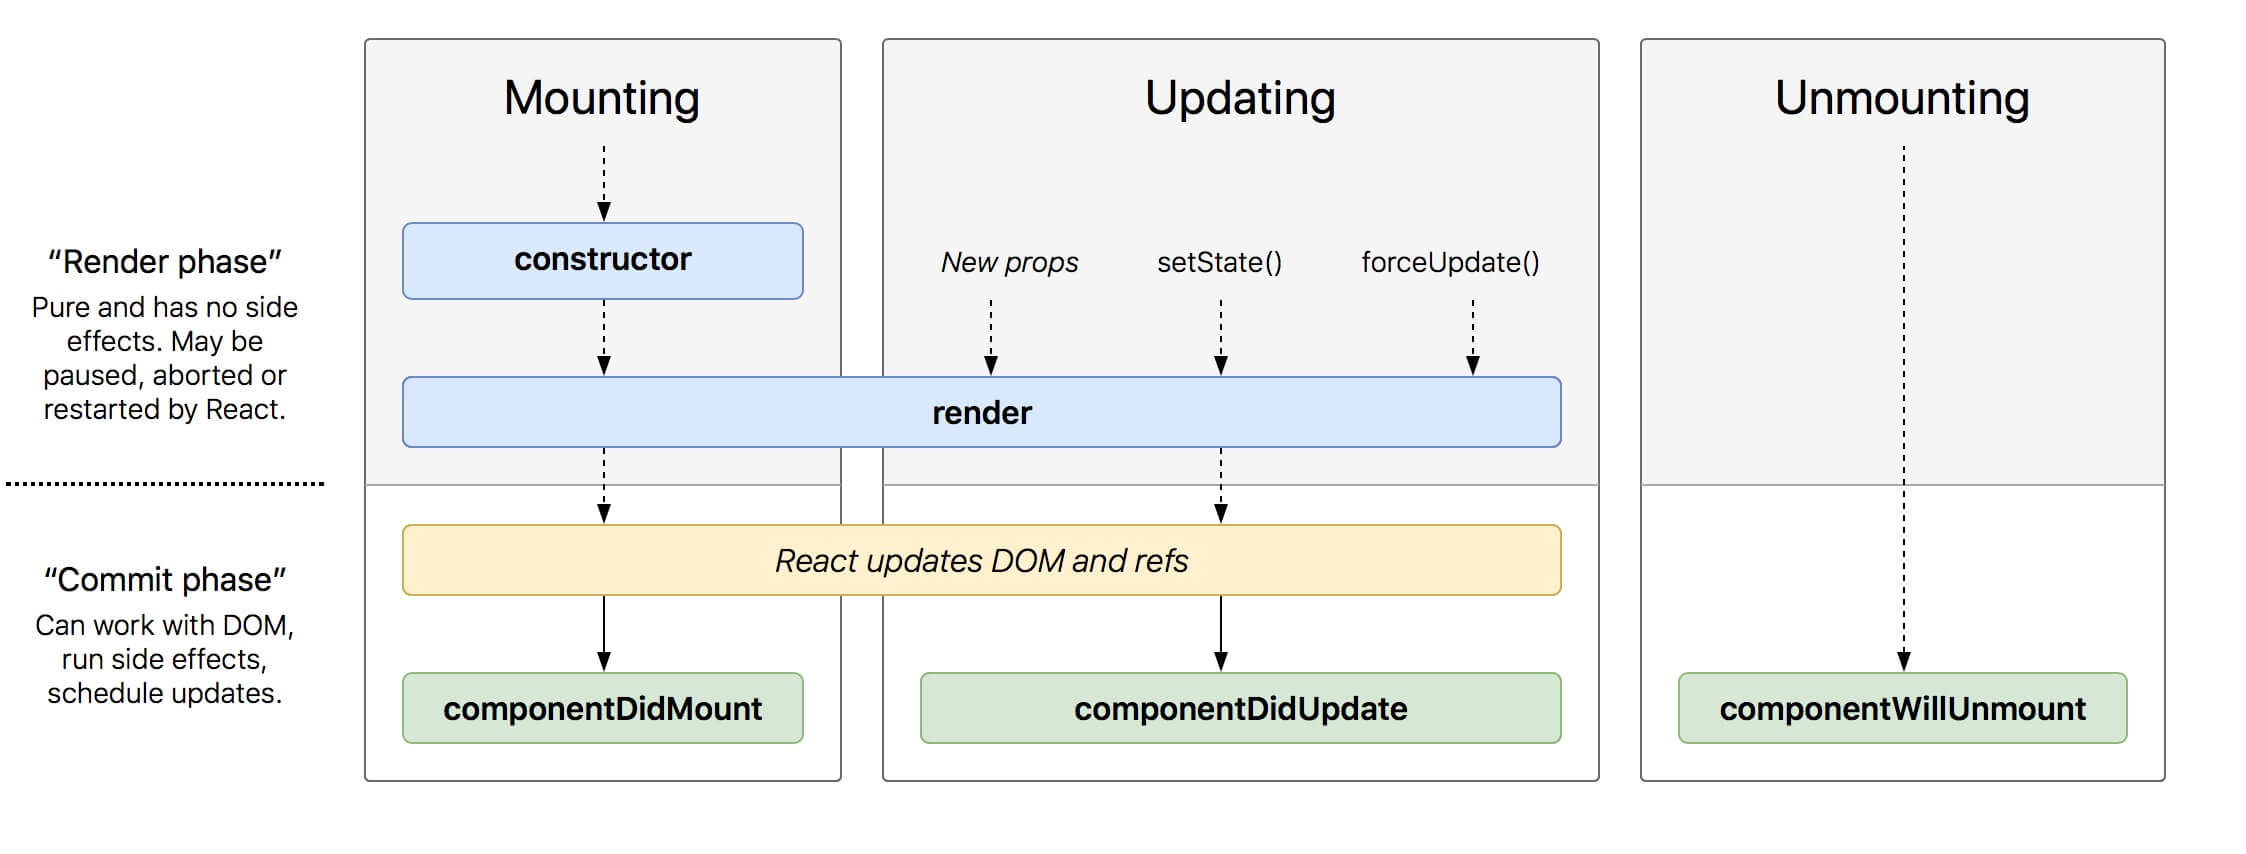
Leaving apart for this post the background purple circle, we said that the post Author (in our example Dan Mardis), will be loaded automatically through an Ajax call (we will se in a future post how we can avoid the Ajax thanks to the magical ‘Window’ object!) and for calling this Ajax function we already used one of the most common Lifecycle methods: componentDidMount().
You can just refresh your memory about this Lifecycle hook here, it executes the code you put in it just after the render() method has been called.
You can do a little test just by adding a different “console.log(‘Here what you want’);” inside the componentDidMount() and the render() methods, giving then a look at the console in order to see what is executed before.

Technically in our case we could also implement the Ajax call in a componentWillMount() that is executed just before the render() and we would have no significant differences; however we explained in the last post how you should avoid this Lifecycle method together with the componentWillReceiveProps() and componentWillUpdate() ones.
Furthermore, one of the reason that led the React team to make the componentWillMount() deprecated is just the abuse that someone did of it fetching in it data in order to avoid an initial empty state (just for this loading time we used – and is always recommended to do it – the Divi Loader!); it is just an illusion, cause the render() is fired soon after the componentWillMount and in most cases the difference is really imperceptible with the performance disadvantage that using componentWillMount you can have a multiple re-rendering!
So, every time we want to add some call to external resources for the first time the component is loaded we have to use the componentDidMount() hook; the same way if we want it to call when the component is updated we just have to use componentDidUpdate(). Let’s see an example.
FIRST OF ALL, LET’S IMPLEMENT A BIT
First of all let’s implement a bit our module and let’s say we want to add a checkbox option for showing or not the post Author name. Not too complicated, we open our AuthorCard.php and simply add a setting field fo type ‘yes_no_button’ (and we set the value on ‘on’ by default!):
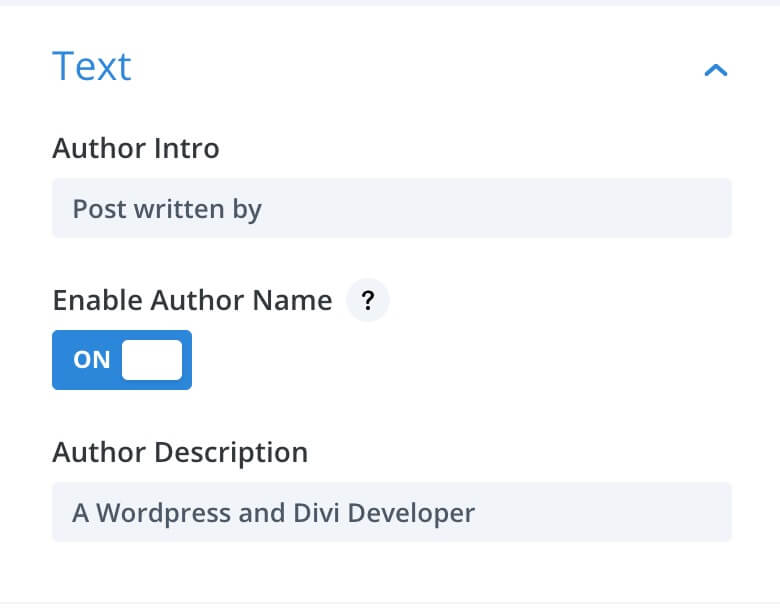
Now we can add a condition in our Jsx file to show or not the Author according to the ‘On’/’Off’ value of our checkbox:
LET’S ALERT WHEN AUTHOR NAME IS NOT SHOWN
Ok, we want to give the user as much choice as possible and for this reason we added the Author Name checkbox; however, for the purpose itself of our module (is called ‘Author Card’ after all!) we want to advice the user if the Author Name is disabled. We can just implement it with componentDidUpdate.
So, let’s add a state named ‘isNamed’ and set it to a default ‘true’ value. Then in our componentDidUpdate() just pass the ‘prevProps’ as parameter, check to see if the props about the Author Name is not equal to the previous props about it and if not just run our code, that is in our case just setting our ‘isNamed’ state to false if it is true, true if it is false.
Now we just have to add a paragraph in our render() function wrapped in a js condition that check if ‘isNamed’ state is set to false:
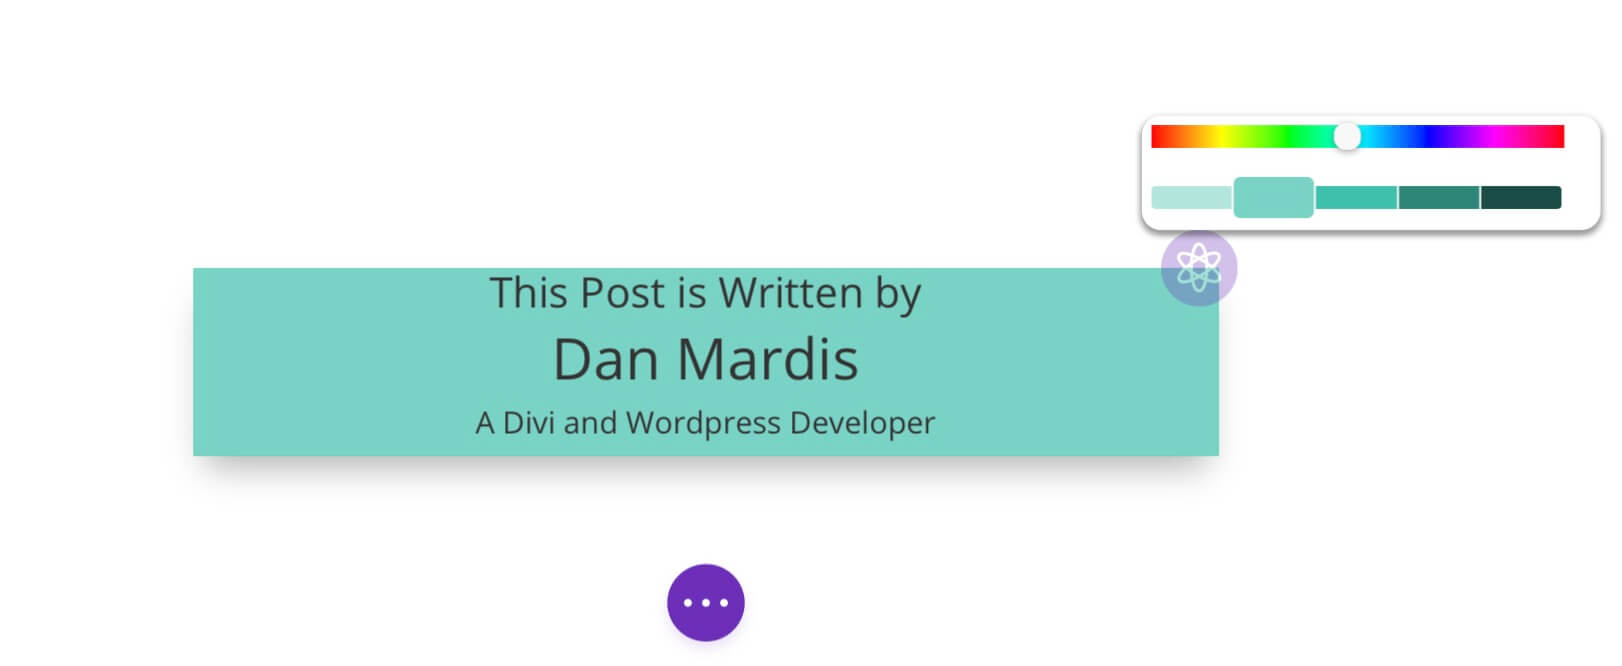
The final result, if the author name is disabled, will look like this:
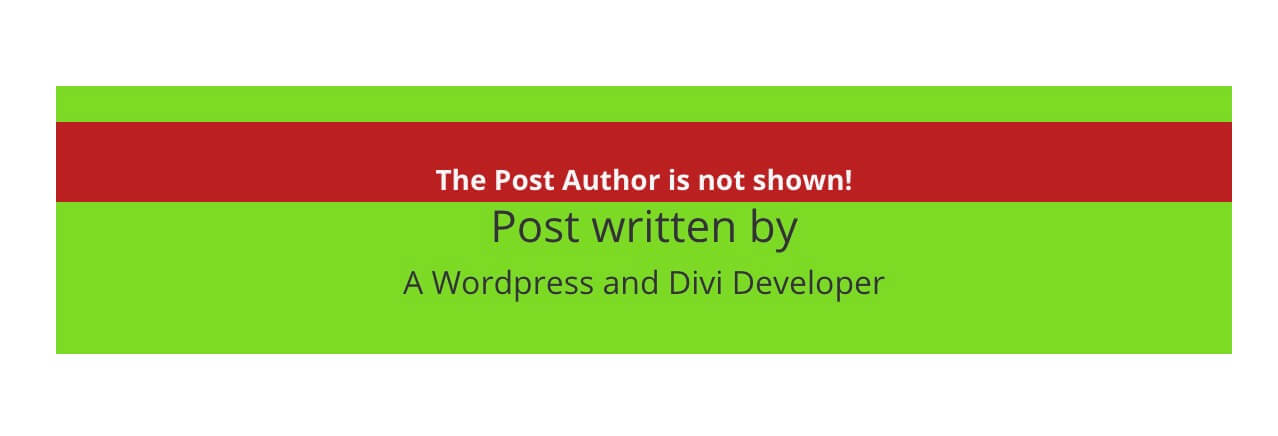
This is just an example about the utility of componentDidUpdate; in this case, in fact, run the code inside the componentDidMount wouldn’t make much sense cause by default the name is shown. We repeat it again, it is just a demonstrative example, in order to get the same result we can simply change our condition in render() and check to see if the Author Name option is ‘off’:
But sometimes, especially if you are working with external resources, you will have to use the Lifecycle method.
DIDMOUNT AND UNMOUNT
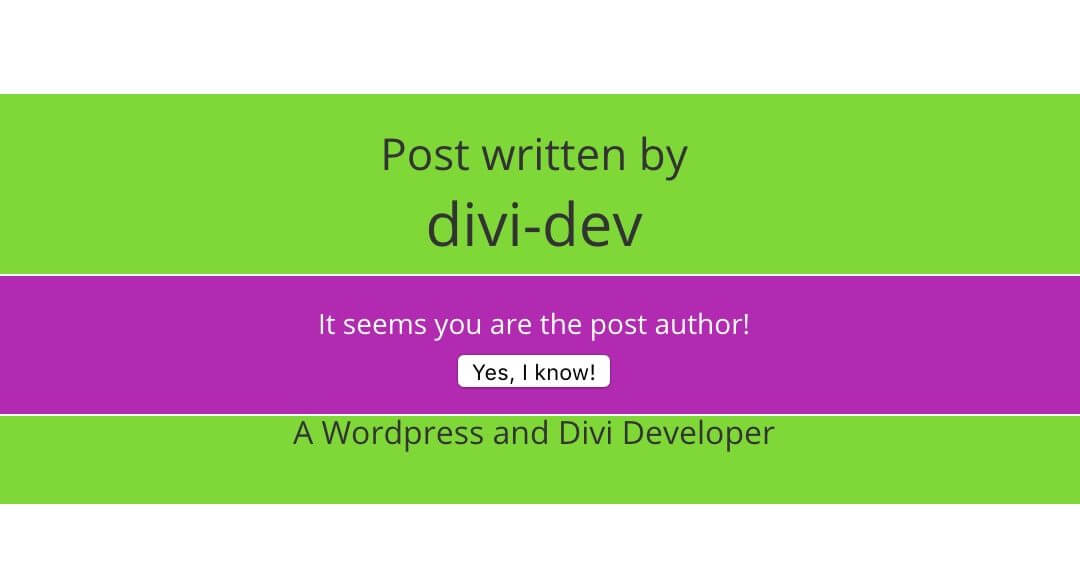
Let’s give another quick example. Let’s say we want to notify the user when the user itself is the post author, something like this:
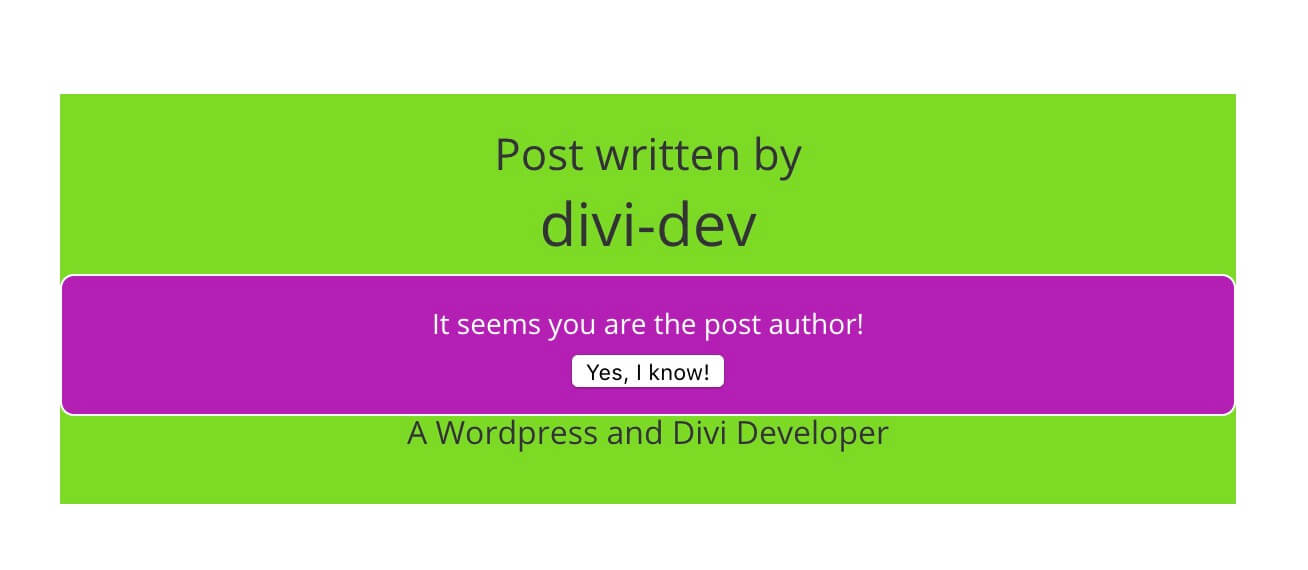
Let’s also say that we want to make this notice appears after three seconds from loading the module and that clicking on the button the user can make it disappears. So we can work again with componentDidMount() Lifecycle hook and setting in it a timer thanks to the javascript ‘setTimeout()’.
We can now set a new state called ‘alert’ and give it a ‘false’ value, then we write a function named ‘message’ in which we grab the current user using the ‘window’ object and compare it to the author state: if it matches then set the ‘alert’ state to true and finally in the render() we do some logic showing the message only when the ‘alert’ state is true, nothing new:
NOTE that we have splitted the main component in two and here is just the render code about the Author name; however you can simply add the logic in your main component!
As last thing we have to clear our timeout when unmounting the module (or also the author name); we can just do it in the componentWillUnmount() that will be fired just before the component will be removed from the DOM:
FINAL THOUGHTS
Ok, as we already said these are just examples to make you see how concretely Lifecycle methods work in your Divi Plugin development workflow.
There’s a lot under the hood and there’s a lot we didn’t cover here as the new Lifecycle hooks getDerivedStateFromProps() and getSnapshotBeforeUpdate() but in most cases the methods we have seen above are enough to develop a Divi module. In the next weeks we will focus on other React-related topics like the Styling, the component structuring and refactoring, the magic of ‘Window’ object and more.
So, stay tuned and see you next post!


